
In partnership with Mintable, a premium NFT art marketplace, you can now mint your augmented reality piece directly from Geenee’s drag & drop code free WebAR builder.
WebAR is an app-free mechanism, removing the barrier of having to download a cumbersome app. WebAR NFTs can be accessed with just a simple URL, or QR code.
It means you can easily share your WebAR NFT across any social media platform, activate from printed media or launch from an email. Instantly create, share, and engage. Now, buyers can interact with digital AR artworks in ways unimaginable just a decade ago.

Levitate WebAR NFT, powered by Geenee AR. Demo here- click to launch!
If you’re totally new to NFTs, don’t worry, we’ve got you covered in this blog post: Augmented Reality NFTs are as Easy as Drag & Drop.
Below, we’ll take you through how to mint your WebAR project in just four easy steps. Let’s get started!
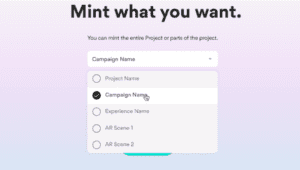
Step One: Choose your Project
The journey begins! Choose from the dropdown menu which project you’d like to transform into an NFT.
For published projects:
- Click “unpublish”
- Then click “publish” (to republish)
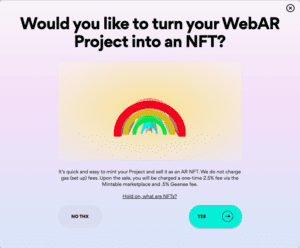
- A screen will pop up asking if you want to transform your WebAR project into an NFT
For unpublished projects:
- When you’re ready to publish it, click “publish”
- A screen will pop up asking if you want to transform your WebAR project into an NFT
The next step is to connect your Ethereum wallet!
Step Two: Connect your Ethereum Wallet
If your wallet is already setup:
If you already have your wallet setup, have your password handy. Enter your password, then skip ahead to step three!
If you’re setting up a wallet for the first time:
See below to learn about what wallets are, how they’re used, and how to set up your very own Ethereum Wallet (it’s easy!):
What is an Ethereum wallet and password?
A wallet password is used to confirm outgoing transactions. You need ETH (ethereum) in order to submit any transaction on the Ethereum blockchain to mint your NFT. A wallet is where you hold your ETH and how you submit transactions/create/buy/sell items on Mintable.
Our partners at Mintable recommend the MetaMask wallet.
How to setup a MetaMask Wallet:
Get MetaMask at their official website: https://metamask.io
Wallets are ultra secure – we can’t do anything without your permission. You have to manually approve or deny every transaction to make sure you agree. But don’t worry, it’s easy:)
If you need any more info on an Ethereum wallet and how to get one, check out this handy resource via Mintable.
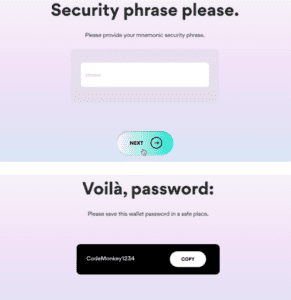
What is a security phase and why do we give you one?
A mnemonic phrase, mnemonic seed, or seed phrase is a group of words that allow access to a cryptocurrency wallet. Other names for this include “recovery phrase” and “backup phrase.”
Wallet software will typically generate a seed phrase and instruct the user to store it securely.
Retrieve your security phase to complete this next step.
If you’ve used MetaMask for your wallet, it uses BIP39 to generate a seed phrase for your wallet. Your seed phrase will cover every token, address, and transaction generated by your wallet. Think of it as your backup master key. Backing up your seed phrase ensures you will always have access to your funds.
If you did not write it down or lost it, you can log into MetaMask and Reveal your Seed Phrase / Secret Recovery Phrase.
There’s also a unique password we’ll generate for you for extra security. Don’t forget to copy it down and store it in a safe place!
Now that you’re all set up. Let’s get started!
Step Three: Add Details
Once your wallet is connected, you’ll be prompted to add details to your project.
Your NFT will be auctioned on the Mintable marketplace. Adding additional details to your WebAR NFT will offer more visibility, and enable followers to find your pieces easier too.
NFT artists and buyers are a very close-knit community. If this is your first time minting artwork, check out some of the artists on Mintable to see what has done well, how artists are telling their stories, what’s trending, and how to position your unique art piece.
Buyers love to know what your NFT is about. Why should they buy it? What makes the price fair? Think about the story of your piece, how it compares to what’s out there, and what price point will make your AR NFT competitive.
With a simple QR code, potential buyers can even interact with your AR NFT before they buy it! This is great for getting the word out there and encourages sharing on social media.
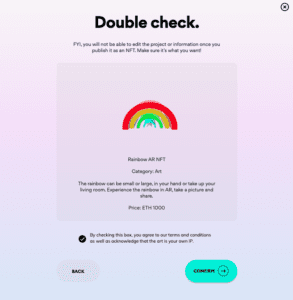
Don’t worry, you’ll be able to double-check how your AR NFT will appear before you mint it!

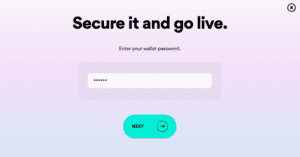
Step Four: Mint and Share!
Now, it’s time to mint your very first WebAR NFT!
Enter your wallet password to register your artwork on the blockchain.
We do not charge any gas (set up) fees. Upon sale, you will be charged a one-time 2.5% fee via the Mintable marketplace and a .5% Geenee fee.
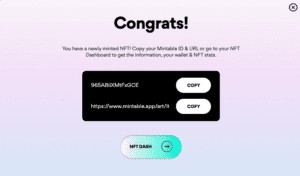
Finally, congrats! Your newly minted WebAR NFT is ready. Copy your ID and URL or go to your NFT Dashboard to find additional information and NFT stats.
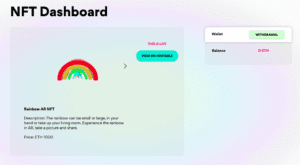
BONUS: Access Your WebAR NFT stats and NFT Dashboard
In your dashboard you’ll be able to track:
- All-time views
- Monthly views
- Number of bids
- End date of bidding period
You’ll also be able to see your wallet balance and track activity on your account.
We can’t wait to see what you make, and we’d love to feature your work. When you’ve minted your WebAR NFT, tag us on socials, and don’t forget to submit your work for a feature in our newsletter! Reach us at [email protected].